-
 Visor sewing tutorials.
I've had a search on the forums but can't see anything but is there a thread or a tutorial on resewing visors back in their original location?
Or can anyone point me in the direction of a source please?
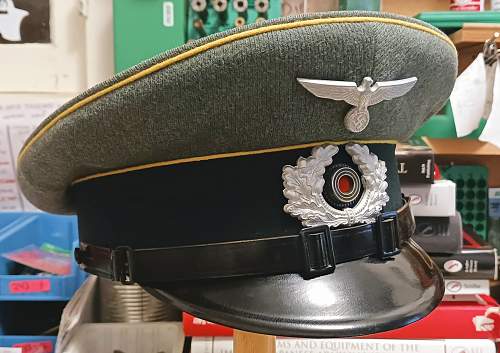
I've picked up an officer cap that has a loose visor, could do with re-attaching and I'd like to try to do so myself. The thread is what has broken, the holes in the actual visor are still intact.
 Looking for LDO marked EK2s and items relating to U-406.....
-
12-05-2023 10:34 PM
# ADS
Circuit advertisement

-
-

Contact Wolfgang, Erwesa.
Ralph.
Searching for anything relating to, Anton Boos, 934 Stamm. Kp. Pz. Erz. Abt. 7, 3 Kompanie, Panzer-Regiment 2, 16th Panzer-Division (My father)
-

I'll have a try:
First thing is some suitable very strong thread (period thread very often isn't very strong any longer, that's why the edges of the bill where the tension is strongest tend to break it) preferably made of natural materials (cotton, silk - the strong one for button holes) and a leather sewing needle with a rounded tip (no pointed one!) in a suitable size which will go easily trough the existing stich holes.
Thread the needle and make a big knot in the end of the thread so that it won't go through the first stichhole you fill.
Begin sewing 4 to 5 stitches before the empty holes. Begin inside of the cap. Stick the needle through the hole in the leather, then trough the CORRESPONDING hole in the fibre bill, then try to find the original hole in the fabric and the inside cardboard stiffener (this is the most challenging part when the empty stitchholes start) and see to it that the needle comes out on the other side in the seam of the piping. Now stick the needle in from the outside of the cap in the seam and try to find its way back so that it fills the next stichhole of the bill and the sweatband on the inside. Pull at the thread - after the first two or three stiches with caution so that the end with the knot isn't pulled trough the stichhole, after that you can pull with quite some strength so that everything is tight.
The more narrow the (original) stichholes are the more work this is, the longer it will last and the bigger is the danger that the cardboard stiffener of the centerband will break (mostly it is already broken when the seam is too narrow - then, at least, you won't have to bother to find the right hole, just go through the fabric, the bill will hold thight as well).
As this is hand stitching you will get a seam like this: - - - - - - (no thread in the space between every second hole) which means that when you have succeeded to resew the thing in one direction you have to do the same thing in the other direction, so that there is constant line of thread between all the stitches: --------------- .
It is not very difficult if you have patience and are precise. No stitch should be visible on the outside.
I think quite a good job was done here:
Waffen SS EM
Last edited by ErWeSa; 12-06-2023 at 07:08 PM.
-

That's really helpful, many thanks. Is a curved needle easier to get through the fairly small amount of material or is it easier to use a straight one to line up all the relevant holes?
 Looking for LDO marked EK2s and items relating to U-406.....
-

I have never used a curved needle. As you need quite some strength to get the needle through the material you will have to use something to push it through (either you use a thimble if you have strong fingers or a piece of wood etc.) which will only work with a straight needle. Sometimes I even have to use small pliers to geht the needle out of the other end of the material. This "power transition" doesn't work with a curved needle (and you will hardly find the original holes with it as you see don't know where the tip is - with a straight needle you can at least sense it).
BenVK was/is the specialist for repairs, BTW:
SS Officers visor C&W restored by BenVK
Post # 4 ff:
Custom made Feldmuetzen Alter Art, Crusher Caps!
-

Excellent. Your advice is appreciated. Many thanks.
 Looking for LDO marked EK2s and items relating to U-406.....
-

This is how it should NOT look like:
https://www.warrelics.eu/forum/attac...00723200_n.jpg
Better but still not good:
https://www.warrelics.eu/forum/attac...e-p2111762.jpg
The stitches should be exactly in the (lower) seam of the piping, then they are invisible.
-

Thank you Wolfgang those are very precise instructions,can I roll the piping up a little before the needle exits the piping seam so as not to sew through the piping?. When I finish should I tie another knot on the end of the thread?. I'll give it a try this weekend and hope I don't sew my fingers together. 

Thank You again, Bill
"Only a pimp in a Louisiana whore house carries a pearl handled revolver"
- General George Smith Patton Jr.
-


by
SHEMP H

Thank you Wolfgang those are very precise instructions,can I roll the piping up a little before the needle exits the piping seam so as not to sew through the piping?. When I finish should I tie another knot on the end of the thread?. I'll give it a try this weekend and hope I don't sew my fingers together.


Thank You again, Bill
Rolling up the piping is exactly the idea - the needle should come out in the notch between the piping and the fabric that covers the bottom of the cap. And yes, always also knot the end of the thread as well when the seam is finished - either by a "travelling knot" (make a knot around a needle and pull it down to the last stichhole) or knot the end to the thread. Good luck and please show us the result.
see here:
https://www.youtube.com/watch?v=xhjMSkK8t_Q (travelling knot)
https://www.youtube.com/watch?v=f58woIqfz3o
https://www.youtube.com/watch?v=AcFM6jBY_IU
https://www.youtube.com/watch?v=Em_5BvSaXz8
Last edited by ErWeSa; 12-07-2023 at 04:40 PM.


 .
.


Bookmarks